Categories
Practical techniques

Glazing a Victorian Door (Part 3)


Nearly there with the door. Coat of primer yesterday, then will move on with glazing. fitting locks, etc. Looking good I think. I need to decide on a topcoat colour. Black would be easiest choice and may well win out, as time is pressing on.

Categories
Hand Tools Practical techniques

Glazing a Victorian Door (part 2)

I have no idea whether I’m doing this correctly, but it all seems to be going ok. By all means send me tips on how to do this better, or ‘right’. I value the opinions of full-time joiners who do this for a living, especially traditional hand tools workers.
Right, I had a bit of time between the plasterers, electricians and plumbers in the house, so onwards with renovating this old door.

I bought this rebated bolection moulding from an online supplier. I’ve been looking at a lot of east London doors from the period and this bolection was widely used on nicer doors. To choose the right moulding, I printed the pdfs from the online catalogue and held them up to the door.
I will be adding the moulding to the lower panels as well as the upper glazed panels. The lower ones are without any profile at all here, because I’m flipping the door to keep the hinges on the same side for the joiner when he hangs the door. The old door was left-side hinged, but my house door needs to be right-side.
A little trick I learned from an old picture framer. Mouldings are easier to hold in place if you flip one on top of the other and clamp them down. It works with most profiles. Instant holder!
If anyone has opinions about massive workshops, £4k Roubo workbenches and insights on bench height they want to share, they are probably on the wrong blog.
I honed my Stanley 9 1/2 blade on the diamonds before I started this job. You don’t need anything better.
This will do, once a finger of filler is wiped over. The door is recessed from the elements in an alcove. If I was door a door for bad weather, it would be appropriate to add the mouldings when the door has just been painted, the wet paint gives a good seal.
Lower panels look good. Very pleased with the proportions of the profile.
Tasty.
On to the top panels.
Purely because I haven’t ordered my profiles for the back of the glazing yet, I went ahead and did the bolection on the front anyway. The job would be easier if I did this the other way round, i.e. put in the back moulding, add the glass, then clamp and nail the bolection down tight on the front. Well, I just wanted to get the front done and it went ok.

Categories
Hand Tools Practical techniques Restoration

Glazing a Victorian door

I’m still crazy busy on a house renovation, but one of the projects I’m shuttling back and forth on is sorting out a new front door. The property is a mid-terrace Victorian two-bed, built in 1880. I found a decent door in a reclamation yard locally, for a very reasonable £80.
The current hallway in the house suffers a little from being too dark, primarily because the existing front door has only one tiny fanlight with glass panels.
This new four-panel door will be converted so that the top two panels will hold glass (and a lot more light) into the hall.
I will be fitting frosted safety glass for security reasons and for privacy, and will post more detail about mouldings and fitting as I get round to it.

Interior and exterior Victorian doors can generally be swapped, with the general construction being the same the only difference being exterior doors are usually a little thicker. This Victorian door has a substantial weight to it and is around 42mm thick, so should make a good exterior door for a house I’m renovating. Here, I’m going to remove the wooden upper panels and replace with glazed panels.
You can price the mouldings away if you tap a blunt chisel under them and gently lever them out. Trick is to start from the centre of the mouldings and work into the corners. The centre of the mouldings will be more flexible and it will be easier to loosen the nails.
You can then use these holes to start a jigsaw in, so just cut out the panels, leaving an inch or so around the edges.
Once you’ve cleared the existing mouldings, drill some big holes into the corners of the panels.
Once you have removed the majority of the panel, you can cut into the corners and ease the remaining bits of panel out of its rebate. They should come out easily, as they are just rebated in loose, to allow for movement.
Getting there. One panel cut out, one to go.
Here I’m prising one of the more reluctant strips out.
All cleared out now and you can see the rebate all around.
This rebate will no longer be needed, as glass will be dropped in and with a rebate it would slip around, so the next step will be to fill the rebates with wooden strips and plane flush. More pics soon.
Categories
History Practical techniques Richard Arnold

How to use a sash dowelling box

The glazing bar dowel joint quickly became superseded by the mitred joint. However, the joint itself (and the use of a sash dowelling box to make it) is of some interest to me. It’s actually very simple, as Richard Arnold showed me.

This beautiful sash dowelling box was given to Richard and resides in his tradition tool collection. He remarked on the excellent construction and the fact it seemed almost too professionally-made to be a user-made tool. After handling it, I would agree.

The screw underneath raises and lowers the end piece of the box, adjusting where the drill hole will be positioned on the butt end of the glazing bar.
Insert your glazing bar, push it to the end and clamp down the screw on the top to hold it in position.

Makes sure it's fully seated or your hole will be in the wrong place.
Makes sure it’s fully seated or your hole will be in the wrong place.

Clamp the box endways in the vice and locate your bit into the drilling hole. The end box should already be raised to get the right height. Then just drill away.

There you have it. Your glazing bar is now ready for a dowel joint.

Categories
Jane Rees Practical techniques

How to use sash templates, or ‘templets’

A matching sash plane and templet by Moir & Co., Glasgow (1836-75), from the collection of Jane Rees.

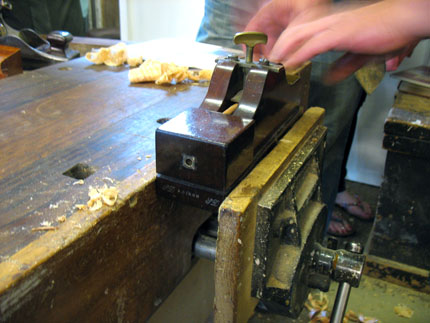
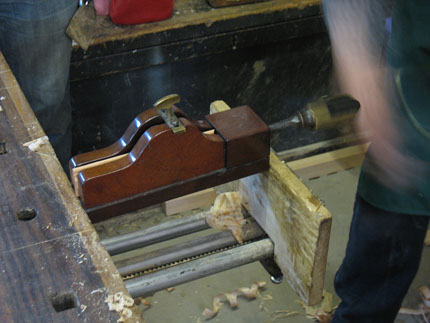
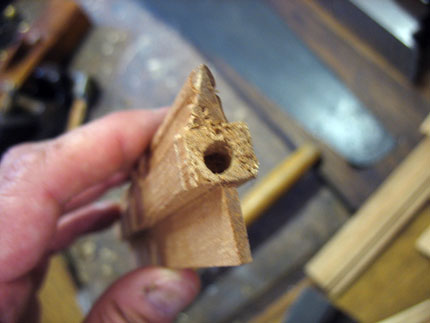
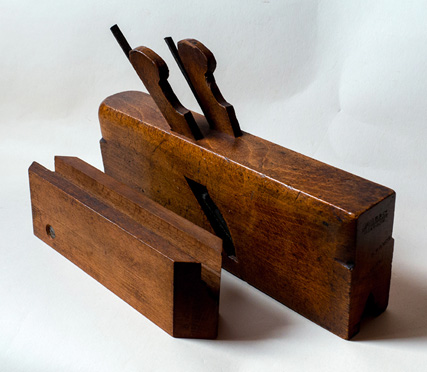
For some time now, I been drawn to the idea of making traditional box sash windows using mainly hand tools. By ‘traditional’, I mean sticking the mouldings of the glazing bars with sash planes, rebating the stiles and meeting rails and chopping out all the mortise and tenons by hand.
One thing that has always confused me. Even though I have now found some excellent sash planes, I still wondered how craftsmen used to mitre the cross joints so accurately.
During bits of research on the internet, I’ve come across some excellent resources, such as this pdf from Tim Nott.
However, some tools that kept cropping up in 18thc-19thc information, was the use of sash templates, or ‘templets’. I sent a query to Brian Read at the excellent Tools and Trades History Society, asking of he knew of anyone who could show me how to use these and perhaps I could photograph a slideshow. (This enquiry applies to anyone else who also happens to read this post. I live in London and would still very much like to watch a joiner who can show me these in use.)
Brian was very helpful and forwarded my request to Jane Rees, who many readers will be familiar with, from her and her late husband’s excellent books about vintage tools.
Jane came back with some great info. To start with, if you were making sash using a template, you would have been expected to have a matching plane, to make a perfect profile to drop into the template. This I didn’t know.
One style of sash templets, (showing brass bound ends).

Another style of sash templet. I have seen many more of this style, but the use of this pair would be somewhat compromised by that lack of matching plane.

A photograph of the sash plane page from the Alex. Mathieson ca, 1919 catalogue. (Image kindly supplied by Jane Rees).

Jane supplied me with some of her pictures showing a matched plane with template, some templates of different styles on their own and also a superb pdf of an article Jane wrote for the Construction History Society (which was later reprinted by the Early American Industries Association). You can download a pdf of the article here (3.22mb).

Once you have a profile that has been cut to for the inside of your template, you can work on mitring, or coping the end of it. Mick Dowling of the HTPAA shed some light on this for me:

The components of a sash are the top and bottom rails, the left and right stiles, and the glazing bars.
If you look at a sash from within the building the intersections of the
moulded part of these components (the fancy shaped bit, lambs tongue for example) appear to be mitred, but are in fact coped. Similar to the way the intersection of skirting boards (the board in a room at the base of wall) in an internal corner looks to be mitred, but is one piece of timber cut to fit (coped) over the adjacent piece.
Coping is particularly the case where glazing bars meet the stiles or rails.
I’ve worked on windows as old as the 1860s and have seen stile/rail
intersections that are simply mitred.
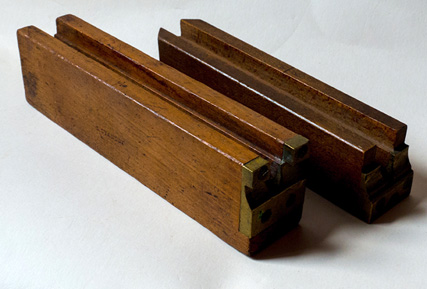
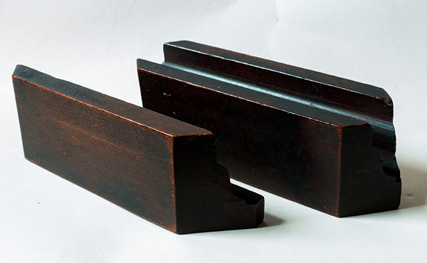
Scribing templates are either double sided to fit over the glazing bar, or
single sided for use on the stiles or rails.
With either of those types there are 2 variations. The ones with brass tips
are square on the end and are used with a coping chisel, and the type that is cut on a 45 is used for marking with a pencil or scribe and cutting out the waste with a coping saw.
Sometimes the single sided ones are screwed together to make a template that fits over the glazing bar. Might have been made that way.

If you’re slightly confused about glazing bars and which way round they face, take a look at an excellent write-up on Zach Dillinger’s blog. He shows you how a sash fillister is used when working on the outer rebates where the glazing would sit. A great page which will explain things much easier than I could do!

(Added 05/10/2014)
David Nelson, a reader of the blog from the US, has kindly sent me a digital copy of his excellent guide ‘English Sash Planes’ and kindly allowed me to add a link to the blog for people to download it. Well worth a read.
EnglishSashPlanesCover
You can download a pdf of the article here (11.37mb).