Categories
Hackney Practical techniques

Mitred beaded face frames

A recent joinery job I was asked to do called for some beaded face frames on an alcove cabinet. This detail works particularly well as it creates a nice shadow break before the flat panel of the door, it’s a detail I see a lot on Victorian houses in London. Making the mitred corners isn’t too hard, but quite challenging if you are doing it for the first time.
A router table and appropriate beading bit are pretty much essential, unless you are running the profile on a moulder. I guess you could set up a router so it’s supported to run the profile horizontally in some way, if you don’t have a router table. Of course, you can always cut the bead with a moulding plane too, if you have one the right size.
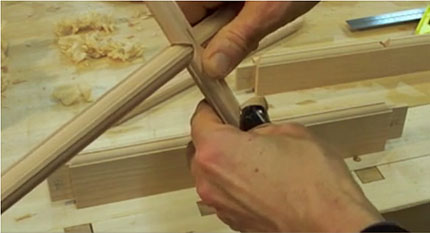
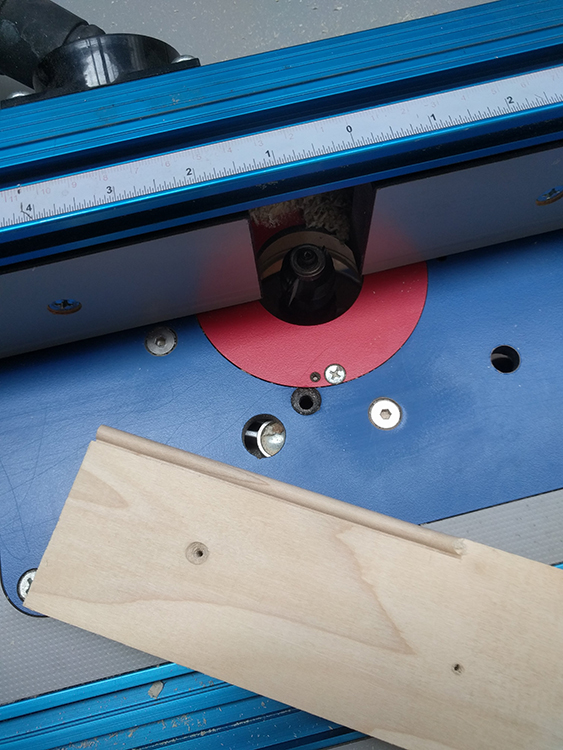
But with a router table, it’s a pretty easy job to set the height on some scrap and run your face frame lengths through. The mitre is achieved by cutting away the bead only in the area where the rails meets the stile. That joint needs a 45 degree bevel through the adjoining beads.
For this job, I cut the beading on the (over-long) rails and stiles. Then, I placed the face frame on the cabinet and worked out where on my stiles I wanted the joint to be. Taking the stiles to the table saw, I cut the 45 degree cuts into the beading and then cut away with a straight blade the part of the beading I didn’t need. Returning to the cabinet, I placed them again and had an accurate idea of the correct distance to cut my rails. I cut the rails and then cut the 45 degree corner from the bead. The beading should them mitre together and your rails and stiles should butt up nicely. (Before you do any of the beading, establish where your Domino joints will be and do those, if you use that technique. Or, if you are using pocket hole screws to join the face frame, you can do this at the end).
Hopefully the pics make sense. The job is now packaged up for the spray painter and should be installed in a week or so, so I’ll take some pictures once it’s in.


And, if you would like to go even further with using your router table to make the joints, then there’s a very good tutorial, click here where the chap has a very clear system of his own. He makes use of the Kreg 45 degree bit, which replaces my method of using a 45 degree blade in the table saw.

Categories
Planes Restoration

Calling from the graveyard…

Stanley No.9 Cabinet Maker Plane – Hot Dog
…yes, a Stanley No.9 Cabinet Makers plane, sans ‘hot dog’ handle for now. I’ve not yet had the chance to empty all these more boxes to confirm it’s gone awol for sure. The pics I have so far don’t fill me with promise, but I’ve worked miracles on planes not far off this condition. If it’s rusted through on the bottom though, I’ll be gutted.

Update: Bad News. Halfway through cleaning the plane up, I noticed the back corner was coming loose as there seemed to be a fracture. Sure enough, the rear corner of the plane came away. No idea what I should do with this now. I think it would be possible to weld/braze, but beyond my skills. If anyone out there wants to make an offer on a fixer-upper, let me know, otherwise it might go on eBay.

Stanley No9 Cabinet Maker Plane_2
Stanley No9 Cabinet Maker Plane_3

PS, check out Colin Sullivan’s post about making his own.

Categories
Doucette & Wolfe Practical techniques Youtube

Doucette & Wolfe on Youtube

D&W
If, like myself, you’re into cabinet making, then you’re probably already aware of the wonderful Youtube videos from the cabinet makers Doucette & Wolfe.
These guys are in a class of their own. I mean, it’s not even funny. The precision with which they build is a real inspiration. You can tell they really enjoy it!
Check out their videos (there are a lot of great ones, but click on the ones that mention ‘build’ in the title, as some videos only show the final piece).

A while ago I put up a post about using sash planes and got a lot of people mailing me about it. I think there’s a real interest in traditional window and door making at the moment, as is clearly evident by LAP’s latest re-print.
d&chalflap4waymitre
On a recent D&W video I watched, there’s a great bit 9:50 in, where the guy pushes together two glazing bars he’s made, with hand cut 4-way half lap mitres on. It’s a real nerdy treat and maybe sums up why we love the idea of crafting doors or windows in or on our houses.
I hope these guys never stop posting these videos. I’d love to drop by for real one day.

Categories
College Practical techniques

College course: Day 9

Day 9! Sort of unbelievable how quickly the time goes, I’m about two-thirds through my course. I’m really enjoying learning about casework and the myriad of details that have to be considered. Anyway, here’s the progress on my little cabinet, for those who are interested. Click the pic for the jump.

Cutting dovetails in the rails that connect the two side panels I’ve already made.

The dovetails would be a bit deep at the full depth of the stock, so I’m taking off around half the depth here.

The rail dovetail will ft into the top of the side panel as shown. This rail is the rear one, so it needs to be placed so that it doesn’t impede the groove for the back panel, as shown.

Having drawn around the dovetail, the outside edges are marked. The dovetail length is taken from the dovetail with a marking gauge and transferred to the stock. The same is then done for the depth of the dovetail, which again is marked on the inner panel. The whole waste area is then shaded, so I don’t make mistakes and cut on the wrong side of the line.

After a couple of stiff drinks, the two cuts aren’t bad, and they’re just inside the lines, which is good.

To remove the waste, the panel is clamped down, and little by little, you chop back into the joint with chisel vertical, and remove small amounts by paring into the joint horizontally. Eventually, you have something that looks like this.

Looking back at the image, this is very stupid. If the panels had fallen to the side, it would have cracked my joints. In the semi-hysterical excitement of finally bringing my side panels together, I forgot to notice that. Anyway, the first rail is at least a good tight fit on both ends.

I took a break from the rails, and used the Metabo sander to sand down what will be the top and the shelf for the cabinet. They glued up surprisingly well, and after two passes through the planer, both were pretty good. The top can be trimmed to size once I have the cabinet glued up. The shelf will be worked on next week.

This is the carcass standing upright. Obviously still a little delicate, with no bracing at the bottom yet, but you can see the dimensions. One of my rail joints is sloppy, but hopefully will be ok with generous amounts of glue. It’s all a learning curve!

I popped the top on, just to see how the thickness relates to the proportions of the cabinet. I’m really pleased with this, having drawn up the cabinet myself. I figured finishing the panels with oil might have saved me valuable time, but in reality, it’s a pain in the ass. You’re constantly aware of scratching them. I won’t be doing that again.

Categories
College Practical techniques

College course: Day 7

Great day at college today. Very productive and a good laugh to boot. As we have a break next week, the focus was on getting elements glued up and ready for when we come back in two weeks time.

One of the oiled panels I finished last week. Here it’s dropped into it’s holding frame and it’s ready for glue-up. Sash cramps keep things square whilst being glued, hopefully.
Both side panels of the cabinet, now made up and left to dry. See you again in two weeks.
The cabinet incorporates a shelf, two thirds of the way down. I dimensioned the wood for this (walnut again) and jointed it, so that when glued it makes up a solid panel, with grain matching nicely. The grain ‘crowning’ is upmost on the middle panel, but at the bottom on the outside two. This means as the panel dries over time and shrinks, the whole panel shouldn’t dish.
Same deal here for the top of the cabinet. Another triple-joined panel left to dry, and I’ll bring both panels back down to a flat surface when I return, so not much need to worry about glue overspill etc.