
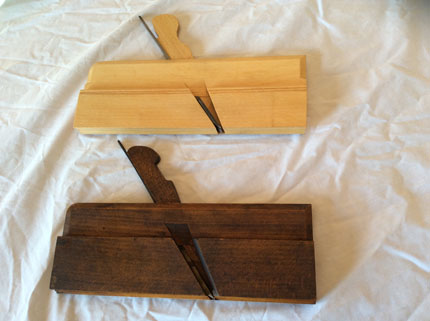
Jeff Murray, a reader of the blog from Greenwood, Indiana got in touch about John Moseley moulding planes. Moseley planes are also a favourite of mine. They are very well-made 19thc planes with sharp boxing and a nice wedges. Jeff talked about using the Moseley design when he made his own half-set. The pic below shows Jeff’s plane (top) with one of his vintage Moseley’s below.
I’ve read quite a bit about the techniques involved in making your own hollows and rounds, but Jeff makes it sound very easy. I’m sure it’s not quite easy as this, but here are some notes he sent to me. Jeff reckons on around $8 apiece for making a moulding plane and about 5 hours to make them himself, instead of $200+ to buy them new.
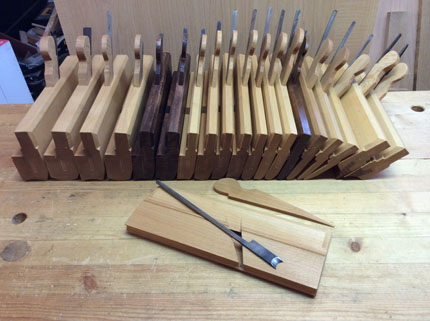
I started out to make maybe 3 sets of hollows and rounds, but ended up making a half set minus the #4 hollow of John Moseley and 2 snipes bill boxed with osage orange. I don’t recommend anyone use osage for boxing because it is really gnarly, but it did succumb to sandpaper. I am planning on making a few side beads and a set of side rounds. I have a number of irons that I got off of eBay, but I’m not reluctant to make my own irons, which I did during the construction of the half set of moulding planes.
It isn’t as difficult as one might imagine to make a moulding plane. I bought a DVD by Tod Herrli on making moulding planes, however he does a few things that require extra work. For instance, he marks all of his layout lines on the beech blank and cuts half of them off only to redraw them. There are a few other things that he does that are a bit unusual also. I got a few pointers from his DVDS, but ended up with using my own methods when they made more sense.The moulding planes were really neat to make especially since I made 11 of the irons from scratch using an angle grinder. Believe me, my angle grinding skills greatly improvided by doing this. I cut out the blanks and tapered them with the angle grinder and then used files to finish them. The total cost of materials was $144 to make 17 moulding planes and 2 snipes bills. The hardest thing to make on the moulding plane is the tapered mortise and that isn’t all that difficult. In fact that is probably 75% of the work. The “blacksmithing” isn’t that difficult either because you are working with relatively small parts. My blacksmithing consists of a propane torch, a metal container of motor oil to harden the irons and finally a toaster oven or regular oven to temper.
(The pics below show the progress of a pair of side snipes.)
You might notice that the boxing is protruding out both ends of the plane. This feature allows me to do a final trimming to make the plane a “perfect length”. The boxing that I used was Osage Orange, native to North America, a very hard, bright orange wood and capable of receiving a fine polish and with a speciic gravity of 773,6 kg/m3. I used this because I just happened some and thought that it would make a good boxing material. However, I don’t recommend it because the grain twisted and turns and is hard to machine. It does however behave when sanded. The final edge was 0.015 inches (0.38 mm) and using 1000 grit sandpaper, wrapped around a dowel, I was able to produce a mirror like surface.In the video by Todd Herrli, he advocates using laminated stock for the body of the planes and if you do some research, you will find that this isn’t recommended. The theory is that the wood won’t properly breathe because the glue layer impedes the moisture and this can cause cracking or splitting. So I stayed with the quarter sawn solid beech that has been the tried and true method for a couple of centuries or so. As I said before, he also marks his layout lines on his stock and then planes half of them off just to then redo them, which seems like a waste of time in my opinion. Todd’s video does have some good information about making the irons, from shaping to the hardening and tempering process.
I thought that might like to see the picture is my high precision jig for tapering the iron. You can see that this scrap piece of lumber was previously used as a backer board for drilling through holes and probably a couple of other things. This is one of the irons that I cut out of a piece of tool steel with a cut off wheel on my angle grinder and then changed to a grinding wheel to taper the tang. I used water to occasionally cool the steel when it started to discolor. “Bluing” of the iron is of no consequence at this point in the process, that can all be taken out when it is hand filed to the final shape.


(Note from Admin.Caleb james is also giving away some very nice wooden plane plans for free. Click here.)
6 replies on “Making your own moulding planes”
Hi Gary,
Thanks for your post on making a pair of snipe bill planes. I am going to make a pair, however I haven’t decided what I should use for the boxing yet. I appreciate your willingness to share information here. I have molding planes, hollows and rounds, that I can use for reference and to shape the soles of the planes. If you don’t mind I’d like to ask for your advice when I get to the point of making a couple snipe bill planes.
Blessings,
Jim
I agree in principal with your assessment on the laminated pieces of qsawn beech he puts forward in the video. However, what do you do when you need a blank that fits a 2 3/8″ cutter and all that you can get is 8/4 rough qsawn beech that 2″(ish)? Most, if not all, of the the lumber yards that I’ve spoken with that carry qsawn beech won’t carry 12/4 or 16/4 product as it cracks too much during the drying process. Have you been able to source 12/4 qsawn beech for those wider planes?
Granted, it’s only for a few of the largest planes but it’s gonna happen. Less so with hollows and rounds but certainly a bit with moulding planes.
I found a tool, with markings John Moseley & sons with the London address, also marked JT OSBORNE PRODUCTS, also says RT JONES on it,solid wood, looks like it’s for making moldings or something, can I send a photo & get you thoughts ?
The snipes bills turned out real nice, I’m looking forward in making my own set of moulding planes and others profiles as I too cannot afford to spend $3000 for a small set of hollows and rounds. I can understand where the costs are coming from, you mentioned the timber costs around a $8 piece but the real costs lie in labour. Most workshops operate around $40 p/h plus cost of materials and other general expenses. These guys that are making planes are trying to make a living out of it and to do that they need to run it as a business. Besides due to how long a traditional moulding plane takes to build and low sales volumes it actually produces it really isn’t a viable business. Old street stopped taking orders because they are 2 years behind and with obvious health problems and how long it takes to make a set do you honestly think they are making money out of this. I don’t think so but these guys are crucial to us the users because once they’re gone they will sell for double in antique shops, eBay and tool dealers. Caleb isn’t going out of his way to produce many planes for sales for the obvious reason that most of us cannot afford them so why bother directing effort into a product that produces no income.
I spoke to a tool maker and asked him who is your biggest clients and he was honest when he answered the hobbyists who are bankers, accountants etc. Those that are in the high salary brackets not the tradesman he can’t afford them so he makes his own but the hobbyists they are the ones who can and will pay top dollar. No tool maker goes out of his way to rip anyone off they charge accordingly much like we all do, only massive corporations will rip people off.
Quartersawn beech is hard to get rift sawn is easier but both are also very expensive so Tod Herrli is right in what he does, laminating really is the most cost effective way of doing it. What you say about glue is true with all modern day glues but if you use hide glue you won’t have the same problems because it allows the timber to move so there shouldn’t be any cracks and so forth.
In one of your pictures, there is a blueprint of the snipes bill plane that you are making. Can you share this document or at least point me in the right direction on where to get it? Thanks.
Thanks for sharing your information! I was wondering if we could get/purchase your plans for your snipe bills? Jeff