Categories
Chris Wong Measuring & marking

Gauge modification

heptagonal-gauge
Chris Wong has a got a nice mod over on Flair Woodworks. A simple modification to stop his marking gauge rolling off the bench and hitting the floor. By filing down the round profile, you get an octagonal, heptagonal, (you choose), shape that doesn’t roll quite so easily.
It’s a nice tweak and I guess if you have one of these gauges, pretty easy to do.
With regards to gauges, I’m with Paul Sellers. I like the old mortice gauges and have always found the standard pins give a fantastic result for marking. Not only that, they are easily sharpened and replaced. Like most things in life these days, these new gauges come with the need to keep buying new cutters. Get yourself an old-style gauge, make sure it has good pins, then really you can’t go wrong.

Categories
Moulding planes People Planes

More from David Nelson on sash work

Dave Nelson
One of the most madly popular downloads from my site is David Nelson’s ‘Guide to English Sash Planes’ which he sent me a couple of months ago.
David has just sent me another two chapters of his book for download, ‘Sash Planes’ and ‘Sash Tools and Sticking Boards’.
English Sash Planes (The original download).
Sash Planes
Sash Tools and Sticking Boards
Thanks David!

Categories
History London People

Michael White, cabinet maker

Back in September last year, I had the pleasure of visiting a wonderful violin shop and its restoration workshop called Bridgewood & Neitzert.
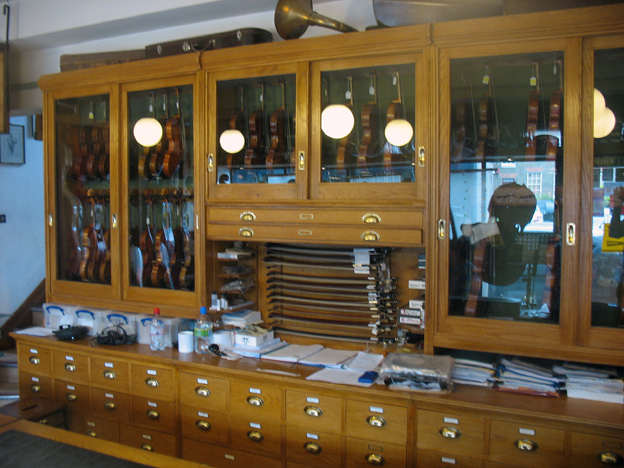
If you look at the slideshow, you will see the superb cabinet work of Michael White. I asked Gary Bridgewood for more information about Michael and how he came to meet him. His response via email was such a lovely portrait of Michael that I asked if I could reproduce it in full. Gary’s email is below, with some pictures he also kindly forwarded to me.
I started this blog because I wanted to show the work and skill of proper traditional cabinet makers, joiners and woodworkers like Michael and I hope to connect with many more like him.

Michael White 5

Michael White made all of our cabinets, sadly he died nearly three years ago, and he is terribly missed. He worked with us for 18 years. It’s quite an interesting story, an artist friend asked me to help her deliver a painting she had made of a woodworker. She had been commissioned to paint the inside of a lid for Micks tool cabinet. Mick lived in the Goswell Road in a tower block on the 14th floor. His tool cabinet was truly incredible.
Michael White 6
He had started out as an apprentice at Cubitt’s, I think in the Grays Inn Road. He was a sea cadet and involved in D-day but as a skilled woodworker was conscripted to stay repairing London during the blitz. The cabinet was about 8 feet high with another bell shaped cabinet below, which had a pull out section made of exotic woods. He had inlaid the old three penny coins around the edge. He had never finished adding to it and amending details, it was truly a superb piece of work. My artist friend painted Mick planing some wood with his tool cabinet in the background.
Michael White 2
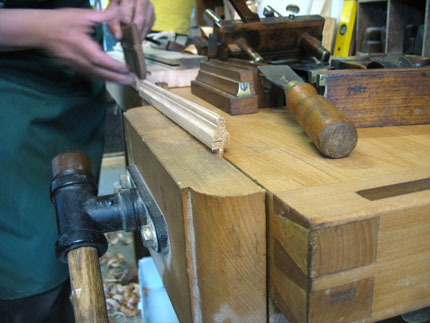
We got on very well and Mick was very interested in violin making, which I was doing a lot more of back then. I invited him to come and visit and said if he ever wanted to use any of our machines in our basement he would be very welcome, as they rarely got used.
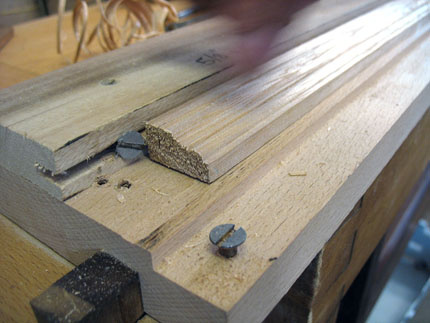
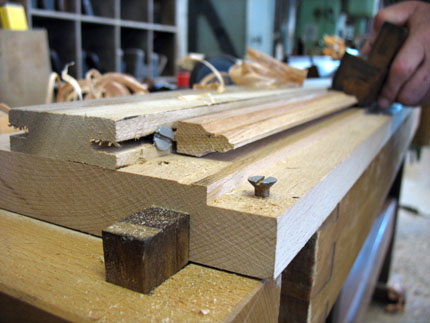
I didn’t see Mick for about 6 months when one day he arrived in his best suit at our door. After tea and a good look round he was ready to leave and once again I offered use of our facilities, Mick said he’d think about it. About four months later Mick arrived in his work wear and asked me what I wanted doing first! I was quite taken aback and said why he hadn’t brought his own work; Mick said he’d prefer to help us first. Anyway this conversation was to be repeated for the next 16 years, only towards the end when Mick was not well did he decide to finish his cabinet and the last job was finishing the pull out section with carousel which was full of drawers and hanging sections which had a handle in the top and could be removed when working on site. I supplied Mick with pieces of ebony, rosewood, and quilted ash and of course violin maple for the drawer fronts, it was spectacular when finished.
Michael White 3
Mick kept finding things to do and useful places to make a cabinet or shelf to maximise storage, his last project was our violin/viola/cello case display cabinet which was finally finished and installed by my friend Hugo.
Bridgewood&Neitzert_03
Michael White 8
Mick told of his master whose name I think was Spirro, he trained at the Vatican and Mick said his training was not only woodwork but carving, gilding , drawing/painting and stone work, his apprenticeship lasted 16 years! Mick was lucky enough to train under Spirro at Cubitt’s. He also told many, many stories. One was for one of the old carpenters who worked at Cubits whose tool chest doubled as his coffin and was kept at the end of his bed.

Categories
History Practical techniques Richard Arnold

How to use a sash dowelling box

The glazing bar dowel joint quickly became superseded by the mitred joint. However, the joint itself (and the use of a sash dowelling box to make it) is of some interest to me. It’s actually very simple, as Richard Arnold showed me.

This beautiful sash dowelling box was given to Richard and resides in his tradition tool collection. He remarked on the excellent construction and the fact it seemed almost too professionally-made to be a user-made tool. After handling it, I would agree.

The screw underneath raises and lowers the end piece of the box, adjusting where the drill hole will be positioned on the butt end of the glazing bar.
Insert your glazing bar, push it to the end and clamp down the screw on the top to hold it in position.

Makes sure it's fully seated or your hole will be in the wrong place.
Makes sure it’s fully seated or your hole will be in the wrong place.

Clamp the box endways in the vice and locate your bit into the drilling hole. The end box should already be raised to get the right height. Then just drill away.

There you have it. Your glazing bar is now ready for a dowel joint.

Categories
Hand Tools Hollows & Rounds Moulding planes Practical techniques Richard Arnold

Richard Arnold’s glazing bars

When I have a bit of downtime, I sometimes log into my ‘webstats’, so see which posts (if any!) are considered to be popular on my blog.
Always in the top of the league was a rather ‘cobbled-together’ post about making sash and using ‘templets’ for coping the joints of your glazing bars.
Whilst at Richard Arnold’s open day the other day, I had the pleasure of seeing Richard use these sash templates and their associated planes and I will soon post a few pictures about the technique, because I think people are obviously a little confused as to how they are used.
In the meantime, however, I’d like to show a series of pics of Richard sticking glazing bars before he starts considering the joints, because there are two quite surprising things I learned from his technique. I hope you will also find them interesting.

Any idea what this is? No? it's the tip of a simple cutlery knife. Richard has cut it off and ground the edge to make it sharp. he uses it as a 'bench knife'. Now, I always thought a bench knife was a simple knife that might have been left lying around on a bench, something that might have been used for simple tasks.
Any idea what this is? No? it’s the tip of a simple cutlery knife. Richard has cut it off and ground the edge to make it sharp. he uses it as a ‘bench knife’. Now, I always thought a bench knife was a simple knife that might have been left lying around on a bench, something that might have been used for simple tasks.
But no, Richard explained. Once your stock for your glazing bar is captive at the front end of the sticking board, you need a moveable element that will hold the other end. Bearing in mind your stock will be different lengths, it needs to be simple. Bring forth the 'bench knife'. Here, Richard slots the sharp edge into the end of the stock.
But no, Richard explained. Once your stock for your glazing bar is captive at the front end of the sticking board, you need a moveable element that will hold the other end. Bearing in mind your stock will be different lengths, it needs to be simple. Bring forth the ‘bench knife’. Here, Richard slots the sharp edge into the end of the stock.
A few quick taps and that little blade is biting the stock and securing it to the sticking board. Note it is also small enough not to impede the use of your planes.
The glazing rebate is taken out with a sash fillister. Working from the outer face (which will in fact be on the inside of the window), the upper glazing rebate is worked.
Cutting until the sash fillister bottoms out. You would work out the thickness you require for the glazing bead, then the rebate needs to be half the depth that is left once that thickness is taken away from the thickness of the stock.
Richard flips it over and works the other side to the same depth.
Now look. The glazing bead is slotted into a rebate on the sticking board to hold it securely. That also has a screw to hold it, but transversely. Interesting. I think Richard just tapped the bench knife back in again after this.
Out come the sexy sash-ovolo planes with dovetailed boxing. Ooh, matron! Do you know why these often came in pairs, which looked almost identical? it's not the reason you're thinking. You'll have to ask Richard.
Out come the sexy sash-ovolo planes with dovetailed boxing. Ooh, matron! Do you know why these often came in pairs, which looked almost identical? it’s not the reason you’re thinking. You’ll have to ask Richard.
Off he goes, shaping first side. The planes are sprung, but you still need to keep your eye very much on holding the correct profile.
Nearly there!
Nearly there!
Again, the bead is held by the rebate for working the other side.
A few more passes and you just have to make sure things look symmetrical. Easy for me to say, I was just snapping photos.
All that remains is to take of any sliver that might be clinging to the meeting of the top bead. This can be done with an appropriately-sized hollow plane.